As far as I can tell, once an experimental aircraft build project gets to a certain point, there’s a right-of-passage that must be embraced — sitting in the thing. Today is the day.
I made a work platform from wood. It fits inside the fuselage on either side. I can sit on it, if and as needed.
It was time to get an EAA wing stand built. The container with my quick-build kit is on a ship, heading my way. It’s going to be sailing in to Tacoma, WA on or about February 5. A few days after that, I’ll have a shop full of Sling 2 airplane sections – wings, fuel tanks and fuselage. I’ve got to have a place to store both wing panels.
My good friend Charlie used a rainy day to help me. He’s been working hard, building his new home. I enjoy that he lets me help him sometimes. It was nice to have his craftsman expertise and company for my project.
The new portable propane heater can be seen in a couple of the photos.
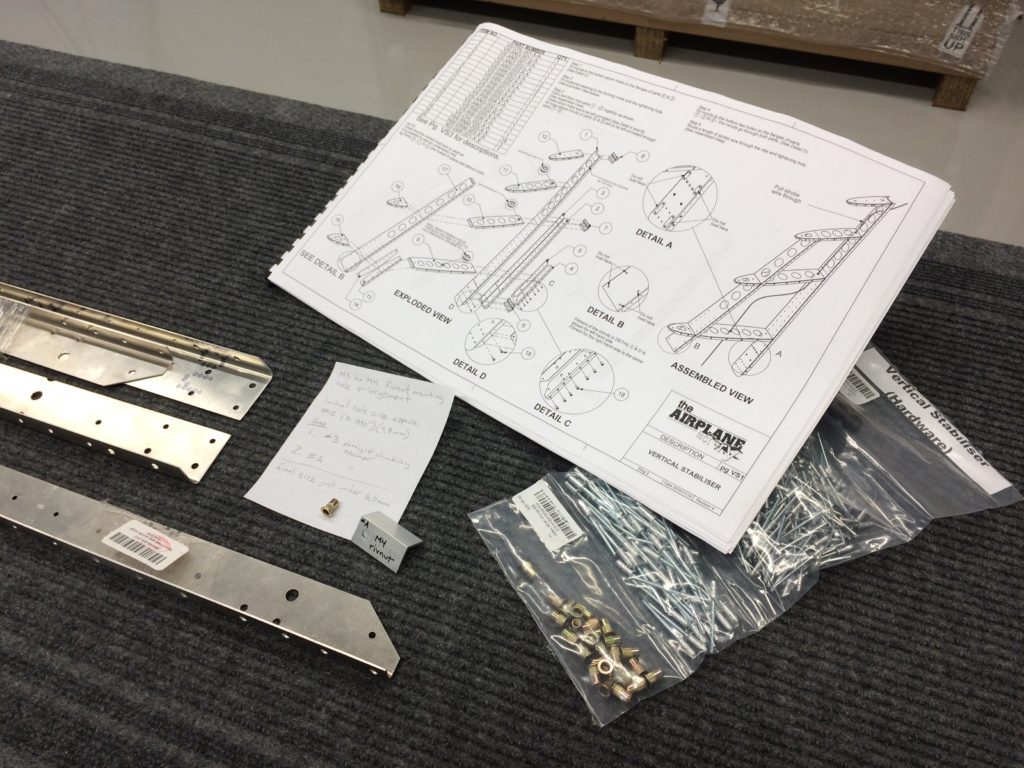
I’ve finally gotten to the point of acomplishing the very first step on page VS1 in the Empennage Construction Manual! I’d been worrying about it. Getting the rivnuts securely mounted calls for a rather deliberate process with good technique. It all went very well. What a relief.
Having an effective tool – Astro Pneumatic Tool ADN14 Rivet Nut Drill Adapter Kit – and practice made the day. I’ve seen a couple of other builders recommend this particular tool. Because it relies on a cordless drill motor and identification of an appropriate torque (clutch) setting, I felt there would be a good chance of getting consistently good results. This seems to be the case.
Practice! I got an assortment of metric rivnuts and used the tool to work with them until I knew exactly what to expect. Now I have 14 perfectly mounted rivnuts!
BTW – the KAI mentions using high strength Loctite to insure that the mounted rivnuts don’t slip in their holes. I say – learn how to mount them firmly and they won’t slip. No Loctite is needed. Because IMO – if they’re not tight enough to stay put, then they’re not satisfactorily mounted.
Before I can accomplish Step 1 in my build, I’ll need to enlarge some holes to accommodate larger M4 fasteners. At some point, TAF changed from M3 to M4 size rivnuts for the vertical stabilizer and other empennage sub-assemblies.
The m4 rivnuts have been supplied with the empennage sub-kit, but the formed parts haven’t been revised to accept them. The build instructions have yet to be updated. Correspondence with TAF confirmed that I will need to do hole enlargement. As the builder, it’s up to me to determine how. This involves tracking down proper tools and developing confidence in a process.
The TAF KAI calls for rivnut mounting holes to be as tight as is practicable and I’ve concluded that a size #A straight flute chucking reamer is the right size to achieve that. This results in the final diameter just under a nominal 6,0mm mounting hole size commonly specified for M4 rivnuts.
I found reaming from #12 to #A size was best done in 2 steps. First, #3 and then #A. This allows the beveled tip of the reamer to align and track nicely with the existing hole as I hold the part by hand and feed the reamer using my drill press at about 750 rpm.
There are also holes for the corresponding screws that will have to be enlarged, once I’ve identified each of them and established what fit clearance is best.
I’ve acquired reamers, developed the process and adequately demonstrated the skills to myself. I haven’t actually started on the build yet, but it feels good to see some aluminum chips in the shop. I’m very close to Build Day 1.