Tag Archives: rework

Wingtips – More Rework

After a gallant effort on the original RH wingtip, I ordered and received a replacement RH wingtip. The new part still had too much length and thickness at the trailing edge, but the workmanship of the layup was much improved and it had noticeably better overall shape. It has still taken lots of work to get the new RH tip to fit. But, it’s coming along and it’s going to work out well.

The LH tip is proving to be huge headache. Despite extensive rework, it’s now clear that the LH wingtip isn’t close enough to the proper cross section to fit and it would take extraordinary effort to get it in the ballpark.

Just like the RH wingtip, the length of the LH part at trailing edge is too long and the trailing edge profile (taper) is too thick to fit the trailing edge wing skin. But the kicker is the overall height. It’s just too narrow – top to bottom. It’s almost 2 cm short, at the widest point.

Trying to stretch the height of the LH tip requires too much force. The LH wingtip has no imbedded reinforcement strip on the bottom edge. The top reinforcement is out of position. Without proper stiffness, the tendency for waviness between the rivet holes would be profound.

To continue with the original LH wingtip, I’d have to section the part and almost re-manufacture it. I’ve decided that it’s much too much time and effort, although I have seen one other builder go to such lengths and spent over 130 hours on just trying to get his wingtips to fit. I’m at more than 40 hours on wingtips and I’m going to cut my losses and get a better baseline part.

I went ahead and negotiated a new LH wingtip from the factory, as I did for the RH side. They’ve kindly agreed to send me one. Kudos to Sling Aircraft for standing by their product. Stay tuned.

Rework Outer Seatbelt Brackets

Any work on and in the center fuselage is part of a big step forward. In this case, the work is actually rework, owing to one of several shortcomings introduced during the factory quick-build of my fuselage – which evidently was a bit hasty. TAF admittedly rushed to ship in the last hours before a three week holiday shutdown. Let’s just say there were a few shortcuts taken.

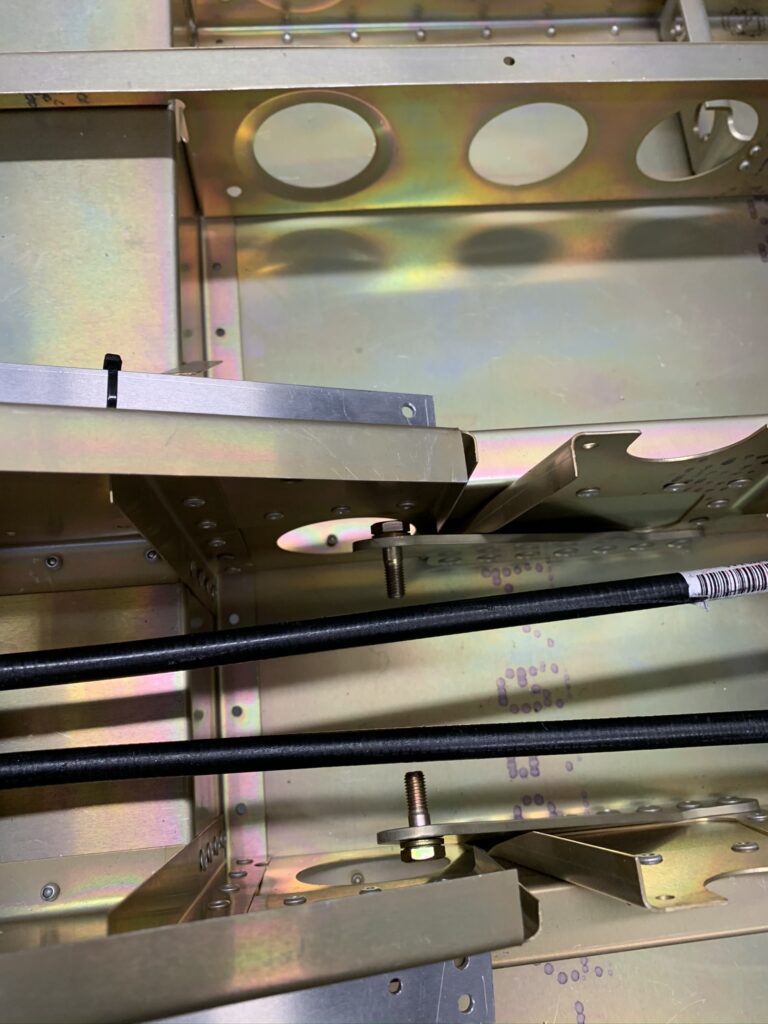
There was a general class of shortcut that I’ve found several examples of – riveting places and parts that shouldn’t have been until other steps were completed. The most vexing examples were the seatbelt anchor brackets being mounted without the AN5-5A bolts and washers in place. I’d noticed this very early on after delivery and have been troubled ever since about how I’d be able to get things as they should be.

As I mentioned in my last post, I finally overcame a mindset that I’d have to drill out and re-rivet the center brackets to place the bolts. With courage and great care I was able to flex my way to a happy result. The outer brackets demanded the drill and re-rivet approach. That has proved very doable, especially since I’ve got the fuselage solidly down on the floor where I can work on it without concern about toppling. Yay again!

I’ve gained some valuable experience with drilling out the big 4,8mm rivets from my rework of the aileron and flap hinge bracket sub-assemblies. With a #12 bit in my lithium battery-powered drill I was able to get the outer brackets off cleanly. And when the time comes, I’ll be able to rivet them back on – with the bolts in place. Glad I don’t have to worry about this anymore.

Fuselage Sitting on Main Landing Gear

It may not seem like a big deal, but having the fuselage safely off of the workbench, where it had been (somewhat precariously) perched, is a great relief and a meaningful milestone. It’s now in a position where I can work inside the center fuselage – comfortably and confidently.

The fuselage spent months sitting on the wooden structure that held it inside the sea shipping container. Then it sat for weeks on a workbench and up on some blocks that I was constantly concerned might cause great damage if the structure should somehow roll forward or backward on those blocks.

With the main landing gear in place and some help from my wife and also from my friend Charlie, the three of us were able to remove another wooden shipping structure at the tail, clear the blocks and the workbench from underneath the center fuselage and set the whole business down on the floor. The tail is supported by a padded sawhorse. Joy! Joy!

I’ve been waiting for months to work inside the center fuselage. I did the first bit of work right away – installing the center seatbelt anchor bolts into the brackets where they should have been placed by the factory – before the brackets were riveted to the CF structure. It’s clearly called out in the construction manual, but the step was forgotten.

At first, I thought I would have to unrivet both center brackets in order to get the bolts into position. But, I eventually became hopeful that I could flex the brackets just far enough to slip the bolts in. Yes! It worked. Good thing too, because it really would have been nearly impossible for me to re-rivet the brackets with conflicting structure in the way. I’m so glad I went ahead and attempted positioning the bolts as I did. Done!

I have the same factory-forgot-the-bolts issue with the outer anchor brackets, but at least there’s ample space to drill out and re-rivet. There’s no way I can flex those outer brackets enough to get the bolts where they need to be. The structure in that area is far too stiff.

Ailerons – Fab, Rework and Pre-Assembly

Aileron assembly has been delayed by ignorance and procrastination. It’s amazing how long it took me to decide to lever $20 out of my pocket for a tool. There’s an anchor nut that gets attached to a rib with a couple of stainless steel rivets that have a 120 degree countersink. I was reluctant to spring for a 120 degree, #40 pilot cutter. This left me pondering various alternative ways I might proceed to attach the anchor nuts. The door was left open because the construction manual doesn’t say anything about it. But, I did have reference examples – other builder’s and identical anchor nuts mounted in my quick-build fuselage. I finally ended up getting the stupid pilot cutter and then mounted the anchor nuts as I knew they should be from the very beginning.

Another self-inflicted setback has been in play. Sometime earlier, I’d riveted one of the aileron hinge bracket and rib sub-assemblies together. Unfortunately, something I’d noticed, but dismissed during initial fitting, had to be corrected. The bolt holes on the inner and outer aileron hinge brackets were not in alignment. To compound the problem, I reasoned that it would probably be ok to ream the bolt holes a little – make them oblong – and somehow that work out ok. Wrong! The result was better alignment, but at the cost of precision (proper) fit.

Sloppy fit for the outer aileron hinge just isn’t going to cut it. What could I do? Eventually, I did what I I should have done in the first place – ask the factory for guidance. I sent an email and got an overnight response directly from Mike Blyth – designer of all Sling Aircraft models. The outer bracket just needs to be bent a bit more. So simple! That absolutely did not occur to me. Sadly, I’d ruined (by reaming) the inner and outer brackets for one aileron and needed new ones. TAF USA rushed me replacements. Fantastic service!

With new brackets in hand, I slightly increased the bends on the outer brackets for both ailerons, removed the old brackets from one of the ribs and riveted all of the sub-assemblies together. Beautiful! I can sleep again. No more worries thinking about how I would try to rationalize wobbly ailerons to myself, the DAR, my technical counselors and everyone else.